

This is really easy and shouldn’t take more than 20 minutes. Since I’ve seen many mentions in random threads but no DIY, considering one significant safety point that I found no mention of anywhere else, here you go.
Tools needed:
Phillips driver
Trim removal tools (optional)
Pliers (optional)
Electrical tape
12 V test light
Hardwire kit (appropriate to your toy)
Zip tie (optional)
Fish tape or something you can drop vertically through the dash. (I used a ligh ball chain that I happened to have in the potato compartment.)
Step 1: Find an appropriate fuse
![]()
![]()
Depending on purpose, you may want a switched power or a constant hot.
With the car off, ground the test light on the door striker (shiny metal U shaped thing).
![]()
Touch the light tip to the exposed metal on the fuse ends or empty slot terminals until you identify what’s constant and what’s not.
Next, if you want to power your device only when the car is on, turn the car on but don’t start it.
Touch the fuse metal and terminals of those that didn’t turn on when the car was off
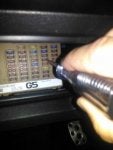
Pic 1: Car off, no power through 7.5
![]()
Pic 2: Car on and yup, that 7.5 is confirmed switched.
![]()
Now that you’ve found where you’re putting the tap, pull the fuse If applicable. I actually used vacant terminal 1 because it’s also switched and the Subaru fuse wouldn’t fit in the tap.
Anyway; you’ll want to use small pliers or the fuse puller located in the fuse box under the bonnet (right side just above the battery. The box opens with 2 push clips; bottom corner and top center, push them and pull it up).
Test left and right of the exposed fuse box terminal to see which side is powered because only one side receives power when there is no fuse.
Note which side of the fuse is “hot” for the install.
... Continued
Tools needed:
Phillips driver
Trim removal tools (optional)
Pliers (optional)
Electrical tape
12 V test light
Hardwire kit (appropriate to your toy)
Zip tie (optional)
Fish tape or something you can drop vertically through the dash. (I used a ligh ball chain that I happened to have in the potato compartment.)
Step 1: Find an appropriate fuse


Depending on purpose, you may want a switched power or a constant hot.
With the car off, ground the test light on the door striker (shiny metal U shaped thing).

Touch the light tip to the exposed metal on the fuse ends or empty slot terminals until you identify what’s constant and what’s not.
Next, if you want to power your device only when the car is on, turn the car on but don’t start it.
Touch the fuse metal and terminals of those that didn’t turn on when the car was off
Pic 1: Car off, no power through 7.5
Pic 2: Car on and yup, that 7.5 is confirmed switched.

Now that you’ve found where you’re putting the tap, pull the fuse If applicable. I actually used vacant terminal 1 because it’s also switched and the Subaru fuse wouldn’t fit in the tap.
Anyway; you’ll want to use small pliers or the fuse puller located in the fuse box under the bonnet (right side just above the battery. The box opens with 2 push clips; bottom corner and top center, push them and pull it up).
Test left and right of the exposed fuse box terminal to see which side is powered because only one side receives power when there is no fuse.
Note which side of the fuse is “hot” for the install.
... Continued


