Subaru Crosstrek and XV Forums banner

DIY: Rear Dashcam Installation

25K views 38 replies 7 participants last post by  AstroKats  
#1 ·
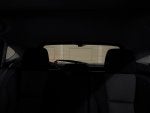
I think the front dash cam install is easy enough, so I'm not posting about it, but I recently installed a rear 'dashcam', and there wasn't a lot of knowledge on this forum (that I could find) about it, so I just want to share my pictures and experience.

Please note that I am using a Blacksys CH-100 system with a rear camera connected via USB cable.

Now the rear camera is trickier than the front for a few reasons. First, if you want to run it through the hatch, there is some complications there, and additionally, especially if running along the top, one has to be mindful of the side curtain airbag.
Now I don't know if my method is perfect, but this is what I did. Please don't hold me responsible for your install, I am not an expert, and this is only what I have done.

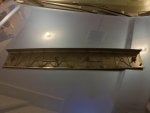
First step was taking the rear window upper trim panel: I didn't exactly know where all the clips were, so it took me a while since I didn't want to break anything. But this picture here should show where all of those clips are to help you:


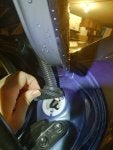
Once the trim piece is taken off, I popped off the headliner and the rubber gasket/tubing. There are two of these on the hatch, but I chose to take it through the right side tubing since there was more available space in the tubing. The left side one carries a thick tube for the windshield wiper fluid, so I found the right to be easier to pass the cable through. The top of the tubing is easy to remove, but the bottom has a plastic lip that looks like this.


At this point, I had to remove the headliner. I popped it in front of the plastic trims, and also removed the three circular clips in the back to allow the headliner to drop down slightly. After slipping the wire behind the headliner, you will be able to see that there is some room to pass the cable through that bottom hole where the tubing comes out of. It took a few tries for me, but I was able to finagle the wire eventually.


I was able to pull the cable through to give me some slack and slowly pushed it through the rubber tubing. This part was challenging since the plug was pretty big, and took quite some time to get through. Re-seating the rubble gaskets is a little challenging, but make sure you get it seated back in correctly, because these are designed to keep water from entering the inside of your car frame.


Once that was done, I put the cable in place, popped the trim back on and left just the short end of the cable dangling out. Note that there is a bit of flex in this panel, and I did not see the need to drill through it, and simply wired the cable through the middle.
 
#2 · (Edited)
For my installation, I stuck the camera to the trim piece rather than the window because I found this made the camera slightly lower in profile (didn't block as much of my rearward view), Additionally, it made for a slightly better image looking through the defroster wires. I did try several positions before settling on this one.


After all of that was hooked up, I connected the wires up to my front dashcam to make sure everything was working. Only then did I slowly begin to tuck the cable behind the headliner. Now, this part is a little hard to describe, but when peeling back the rubber lip, I pushed the cable inside, and then behind the headliner. I pushed it up about a half an inch more inside to find a nice little nook for the cable to sit in. This nook occurs just past the rubber portion of the door seal. At least this is a spot where I am fairly certain is out of the way of the side curtain airbag.


I continued this along the rear passenger side and the front passenger until I got to the A-Pillar. I took the cable down to the bottom of the A-pillar to bring the cable completely around the side curtain airbag to avoid any interference. Once at the bottom, I took the cable back up the A-pillar, this time above the side curtain airbag, such that the cable never passes over the airbag in the way it would deploy.


From that point on, the installation along the headliner to the front camera is mostly trivial, so I won't go into that detail. And a picture of the completed installation


And here is a picture of the front dashcam with everything hooked up.
 
#4 ·
Hey Rx7zone, did you also mount your camera to the trim like I did or did you mount it to the glass? I found that the raked forward rear glass really makes the defroster lines get in the way, but did the best that I could in terms of placement.

I was initially worried about placement as I'd seen another user on this forum have to make an adapter mount in order to place a similar unit slightly lower than where I have mine. But the double-jointed rear view mirror helps with clearance.
 
#5 ·
A handy hint now that you've completed it is to use some silicone lubricate when trying to get the wiring through the rubber boot between the hatch and the chassis. Also, speaking of the boot, the easiest way to get that back on the white plastic frame is to remove the frame from the chassis (it's just held in with a few clips), work the boot back on the frame, and then pop it back in place. I would also put a touch of car wax around the hole before popping it back in.
 
#6 ·
Ahh! That would've been good knowledge to know. When I was going about it, this was mainly an 'exploratory' process for me.

The part that was the most stressful was just trying not to break anything off my week-old vehicle! If the front-to-rear camera cable plug isn't as big, it would probably also be easier to thread through too.

Thanks!
 
#8 ·
If you cover the head with some electrical tape and use a smaller solid wire (ie metal coat hanger) and tape it to the head of the camera wire so that you can use the sold wire to thread it through the rubber boot, it would probably be easier as well. The tape will cover up the edges making it easier to thread through.
 
#7 ·
Thanks for this! For now, ours in on the glass with a loop of wire long enough to be able to open the hatch without tugging it. I was a bit nervous about pulling trim panels off other AstroKats brand new car and, besides, we're not happy with the quality of the non-HD rear cam. This will be very useful info for the upgrade I'm planning.
 
#10 ·
Thank you for posting this install, Centurius. I am about to start an install too, with a similarly shaped camera.

Can you tell me if your camera lens sits in the "wipe zone" of the rear wiper? (For those of us in the PNW, we need to know, otherwise Im guessing all we will see are raindrop-distorted images!) In fact, if you can post a pic of what the camera looks like from teh interior looking back (i.e., drivers view), that would be awesome.

My concern is the balance between getting the camera in the wipe zone versus not blocking any of my view.
 
#11 ·
Hey BigEd,

To answer your question - first of all, my camera actually sits a little bit behind the glass on the trim, and as a result, my rear camera looks out through the whole rear window, as opposed to peering out one little spot of the rear window, if that makes sense. This effect (of the camera looking down the window) is also contributed to the fact that the rear window is so 'raked forward'. As a result of this, the wipe zone, or rather lack of, isn't really a problem for where the camera is mounted.

If you mounted your camera directly on the rear window, then the 'wipe zone' would come more into play. I did check it when initially planning the camera location, and found it not to be a problem even if mounting on the glass, as the wiper does reach up fairly close to the top of the glass. But once again, because the glass rakes forward, your camera would still be 'looking down the rest of the glass'.

Now I haven't yet done any real world testing of this setup yet, so it could prove that I might want to move the camera location slightly closer to the rear window, but for now, the view seems to be pretty decent.

In case my description doesn't really make any sense, have a look at the following two pictures. As you can kind of see from the second picture, you can kind of guess where the wiper sweep is, and see that the majority of the view would be cleaned by the wiper.
 

Attachments

#14 ·
Thanks for the additional info, C.

"because the glass rakes forward, your camera would still be 'looking down the rest of the glass'"

Here is where you lost me, though. The angle of the glass relative to the ground (what I think you are calling "rakishness") is not really any different than the front window angle. Because the camera I'm using allows its lens to rotate relative to the adhesion surface, I can still get it to be parallel to the ground.

In theory, I should be able to mount on the glass at the apex of the wipe zone.
 
#31 ·
Thank you, Centurivus

Just completed my dash cam install--put it at lower part of window with the lens just inside "the wipe zone" of the wipers.

Centurivus, your instructions were very helpful...especially the parts about "going to the right/passenger side" to run the wires rather than left side. At first, I tired the left side and was wondering what was wrong and then reread your advice. Bingo!

I did exactly as you did, so nothing to add. Except maybe that I tapped into the trailer harness for the "always on" power that I needed.


Again, thank you for taking the time to post pics.
 
#32 ·
Just completed my dash cam install--put it at lower part of window with the lens just inside "the wipe zone" of the wipers.

Centurivus, your instructions were very helpful...especially the parts about "going to the right/passenger side" to run the wires rather than left side. At first, I tired the left side and was wondering what was wrong and then reread your advice. Bingo!

I did exactly as you did, so nothing to add. Except maybe that I tapped into the trailer harness for the "always on" power that I needed.


Again, thank you for taking the time to post pics.
No Problem Big Ed!

Glad to have helped! I have also acquired some real-world footage now, so I'll post some pictures of my setup.

Unfortunately, the rear window is sub-optimal because of the rake angle, and the unwiped area does make it into the frame. But I can still see what's going on so I guess it works. I'll post some of those pics when I have some more time.
 
#33 ·
Hi Everyone,

Sorry for the disappearance for the past while. I decided to include some pictures of what my final installation ended up looking like.

First two pictures show some front camera examples along with what the glare looks like. For the most part, it seems to work fairly adequately for what's needed. I mean, not perfect image quality, but really these are only meant to be a crash witness.

The last picture is what the rear end looks like with my setup. You can kind of tell from this picture (I chose it specifically) to show where the wiper sweep stops. It's not a problem during dry days, but the water droplets do become annoying on rainy nights. Fortunately, much of the road is still within the sweeped portion of the rear wiper, so seeing what's going on is still possible.
 

Attachments

  • Like
Reactions: AstroKats
#34 ·
The pics I posted in my thread are very similar. I guess that's about as good as you can expect for glare when driving into the sun. At the moment, our rear cam is at the top of the glass on the hatch but having seen your pics I may move it. I wonder if it would work on the body trim so no need to go through the hatch wiring conduit?
 
#38 ·
Rear Dash Cam Installation - Lower Routing

Great discussion here on the routing of the rear dash cam cabling in a MY18 Crosstrek.

Just thought I would post regarding my recent install of a Blackvue 750 series 2-channel dash cam (Model DR750S-2CH) in a MY18 Crosstrek Limited. Mine has the Eyesight package, and a conventional (not auto-dim) rear view mirror.

The big issue for me was the safety concern about using the upper headliner route, which would be near the side curtain airbag.

In addition to reading numerous on-line posts about the pro's and con's of the headliner route, I also consulted two local auto body shops, including one affiliated with my local Subaru dealer. Both shops recommended that I avoid the upper headliner route because of proximity to the side curtain airbag.

To stay on the side of caution, I took their advice, and routed the rear camera coax cable via the lower route. The Blackvue dash cam comes with 6 meters (19.7') of rear coax cabling. Prior to attempting installation, I pre-measured my intended route and confirmed that I did have enough cable.

Specific routing as follows:

Cable routing was started at the front, then worked towards the rear liftgate. Since my Crosstrek does not have an auto dim mirror, I used that blank hole in the front of the Eyesight plastic cover to feed through both power and rear camera cables. The Eyesight cover did not need to be removed, its flexible enough at its front to allow the cables to be fished through. An extra long plastic tie wrap worked well as a fish tape for this purpose. The rear camera cable was routed leftward, tucked up inside the edge of the driver's front windshield area headliner, towards the A-pillar. The A-pillar trim easily comes off - you just need to carefully twist and release an inner plastic tether to completely remove it.

Once at the A-pillar, the cable stays inside and above the side curtain airbag (it never crosses it). Plastic tie wraps were used to attach the rear camera cable to existing wiring within the A-pillar, then down towards the driver's floor area.

Down at floor level, the driver's left triangular plastic kick trim panel was removed. Door sill trim pieces were also removed from the driver's lower door opening and the left rear passenger lower door opening. For the latter, I found that pulling the rear bench seat release handle, on its left front, allowed the rear seat to be propped up enough to allow easier access for removing the rear sill trim fasteners. Underneath both door sill trim pieces was a recessed channel which looked ideal for running the cable within. I was easily able to fish the rear camera cable underneath the B-pillar, from the drivers door opening to the rear passenger door opening, without having to remove any of the B-pillar plastic trim.

Down at the rear, the ivory coloured trim piece surrounding the little side window, in the rear passenger side cargo area, was loosened by removing the screw where it attaches to the lower black trim in the cargo area. Then, just snapping loose enough on its top to allow a fish tape to get through. It was never removed completely, just propped open a bit.

From the rear liftgate opening, with the window trim wedged opened, a fish tape was able to be snaked successfully towards the left rear passenger door sill area. Unfortunately, when attached to my fish tape, the rear camera cable could not be pulled back, without snagging on something. For an alternate approach, the passenger door weather stripping just above the rear wheel arch was partially removed, creating a gap along the rear black cargo area plastic trim. Within this gap, the rear camera cable was then pulled up from the door sill to about chest height, and from there, the rear cable was successfully fished through. At this point, the rest of the install was the same as described for the headliner route. A few shots of silicone spray inside the flexible rubber bellows tube between the liftgate and the body helped fish the rear camera cable through.

There was just enough cable, nothing too tight, and no slack.

The camera was mounted on the rear glass instead of the liftgate trim. Its rear lens is just within the rear wiper sweep, close enough to the rear window defroster lines, that they are out of focus. During installation, the trim removal tool, which came with the Blackvue dash cam, was very useful.

Many thanks to the other posters on this topic, and I hope this also helps.

JayTee
 
#39 ·
Great discussion here on the routing of the rear dash cam cabling in a MY18 Crosstrek.

Just thought I would post regarding my recent install of a Blackvue 750 series 2-channel dash cam (Model DR750S-2CH) in a MY18 Crosstrek Limited. Mine has the Eyesight package, and a conventional (not auto-dim) rear view mirror.

The big issue for me was the safety concern about using the upper headliner route, which would be near the side curtain airbag.

In addition to reading numerous on-line posts about the pro's and con's of the headliner route, I also consulted two local auto body shops, including one affiliated with my local Subaru dealer. Both shops recommended that I avoid the upper headliner route because of proximity to the side curtain airbag.

To stay on the side of caution, I took their advice, and routed the rear camera coax cable via the lower route. The Blackvue dash cam comes with 6 meters (19.7') of rear coax cabling. Prior to attempting installation, I pre-measured my intended route and confirmed that I did have enough cable.

Specific routing as follows:

Cable routing was started at the front, then worked towards the rear liftgate. Since my Crosstrek does not have an auto dim mirror, I used that blank hole in the front of the Eyesight plastic cover to feed through both power and rear camera cables. The Eyesight cover did not need to be removed, its flexible enough at its front to allow the cables to be fished through. An extra long plastic tie wrap worked well as a fish tape for this purpose. The rear camera cable was routed leftward, tucked up inside the edge of the driver's front windshield area headliner, towards the A-pillar. The A-pillar trim easily comes off - you just need to carefully twist and release an inner plastic tether to completely remove it.

Once at the A-pillar, the cable stays inside and above the side curtain airbag (it never crosses it). Plastic tie wraps were used to attach the rear camera cable to existing wiring within the A-pillar, then down towards the driver's floor area.

Down at floor level, the driver's left triangular plastic kick trim panel was removed. Door sill trim pieces were also removed from the driver's lower door opening and the left rear passenger lower door opening. For the latter, I found that pulling the rear bench seat release handle, on its left front, allowed the rear seat to be propped up enough to allow easier access for removing the rear sill trim fasteners. Underneath both door sill trim pieces was a recessed channel which looked ideal for running the cable within. I was easily able to fish the rear camera cable underneath the B-pillar, from the drivers door opening to the rear passenger door opening, without having to remove any of the B-pillar plastic trim.

Down at the rear, the ivory coloured trim piece surrounding the little side window, in the rear passenger side cargo area, was loosened by removing the screw where it attaches to the lower black trim in the cargo area. Then, just snapping loose enough on its top to allow a fish tape to get through. It was never removed completely, just propped open a bit.

From the rear liftgate opening, with the window trim wedged opened, a fish tape was able to be snaked successfully towards the left rear passenger door sill area. Unfortunately, when attached to my fish tape, the rear camera cable could not be pulled back, without snagging on something. For an alternate approach, the passenger door weather stripping just above the rear wheel arch was partially removed, creating a gap along the rear black cargo area plastic trim. Within this gap, the rear camera cable was then pulled up from the door sill to about chest height, and from there, the rear cable was successfully fished through. At this point, the rest of the install was the same as described for the headliner route. A few shots of silicone spray inside the flexible rubber bellows tube between the liftgate and the body helped fish the rear camera cable through.

There was just enough cable, nothing too tight, and no slack.

The camera was mounted on the rear glass instead of the liftgate trim. Its rear lens is just within the rear wiper sweep, close enough to the rear window defroster lines, that they are out of focus. During installation, the trim removal tool, which came with the Blackvue dash cam, was very useful.

Many thanks to the other posters on this topic, and I hope this also helps.

JayTee
Great write-up!

Unfortunately, this wouldn't work cameras like the Blacksys we used to have that use a USB cable as the limit is about 15ft. I tried...